Saturday, November 6, 2010

Egg-Free Peanut Butter Cookies


Two or three weeks before Halloween my family (mom and sisters) and I decided to go ahead and buy our candy early. Bad bad idea. I totally went the 'holier-than-thou' route when the first bag of candy was opened, didn't touch any of it, and dirty-eyed whoever I saw chowing down on suckers and Tootsie Rolls. But that bag of Reese's and various chocolates was sitting pretty on top of the shelf and I was home alone...so yeah I opened it. A few days before Halloween we only had half a bag of chocolate left and I was craving chocolate and peanut butter 24/7 so to avoid scarfing down more candy, I decided to make some cookies! Plus I had a new peanut butter cookie recipe I wanted to try out, something different than the ones I sell.

I was seriously thinking about peanut butter cookies from the moment I woke up and I was all excited to make my cookies but what did I find in the refrigerator? No eggs! I did take a few minutes to throw a mini-tantrum but you know what? I wanted my cookies so I decided to go egg free. They came out pretty great if I should say so myself!


Egg-Free Peanut Butter Cookies (makes 2 dozen)
Modified from Lovin' From the Oven

o 1 1/4 Cups All-Purpose flour (I used Bread Flour)
o 1 Teaspoon Baking Soda
o 1 Teaspoon Baking Powder
o 1/2 Teaspoon Salt (I used Kosher Salt)
o 1/2 Cup (1 stick) Softened Unsalted Butter (*can be substituted with Vegetable Shortening or Good Earth to make these cookies vegan)  
o 1 Cup Packed Dark Brown Sugar
o 3/4 Cups Granulated Sugar (you can make it a full cup, I just like my cookies a little less sweet)
o 2 Teaspoons Vanilla Extract
o 1 Cup Peanut Butter (I used creamy but crunchy is also pretty good)
o 1 1/2 Cups Dark Chocolate Chips (optional)

1. Preheat oven to 350 degrees. Grease of line two baking sheets with parchment paper.

2.Sift flour, baking soda, and salt into a medium bowl and set aside.

3. In the bowl of an electric mixer fitted with the paddle attachment, beat butter and sugars together until fluffy. Add peanut butter and then vanilla, beat until just incorporated.

4. Add half of the flour mixture and mix for 15 seconds. Add remaining flour mixture and mix until incorporated.

5. Drop dough by rounded tablespoons onto prepared baking sheets, at least 2 inches apart. These cookies only spread a little and they tend to puff up when baking. With either the bottom of a mug or the palm of your hand, flatten the dough just slightly.

6. Bake for 8 to 10 minutes until tops of cookies just begin to brown.

8. Remove pan from oven, cookies will look sightly undercooked but that's alright. Let the cookies sit on the pan for about 5 minutes before transferring them to a cooling rack. Enjoy!

Tuesday, November 2, 2010

A new start of sorts

Well long time, no update! Honestly I'm kind of terrible when it comes to the social networking thing (bar twitter and that's pretty recent) which you might've noticed but I've decided to take stab at it. This decision mostly comes from the fact that I've decided to be more proactive when it comes to my passion for baking. For oh I don't know, quite a few years now its been my dream to be a full-time baker. I've kind of just been waiting for things to fall into place really, to become the baker I want to be.

I've been thinking that it would be better to wait until I could get some professional training before I really tried anything. But the more time I spend online (which is a lot let me tell you) reading blogs and such, the more I start to think thats pretty silly of me. There are so many people who've become successful without waiting around for someone to show them how so there isn't any reason why I can't do it too.

Really the main catalyst for my decision to do more with this blog and my baking is because I've recently gone back to school and...haven't been doing too well. Like, abysmally. Thinking about it makes me want to cringe to be honest. I started college when I was sixteen and I did pretty good in the first semester but going back after a couple of years? Motivation was non-existent on the extreme. I realized that this just isn't what I want to be doing right now. I want to experiment. I want to build up my shop. I want to bake. So I've decided that I'm going to teach myself. I went out and bought 'On Baking' and along with the ton of cookbooks on my shelf, I want to put them all to good use.

With this blog I hope to not only be chronicling what goes on in my kitchen but also the process of me trying to figure out what the heck I'm doing when it comes to baking. Sounds fun, right? I know I'm excited!

Saturday, April 17, 2010

Rösti I say!


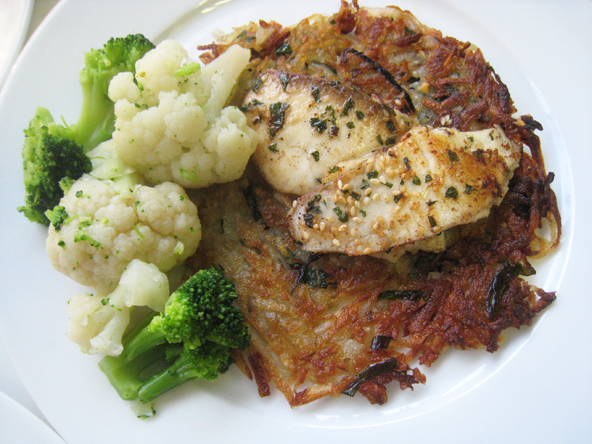
What do you do with a bunch of potatoes and some random herbs? Make Rösti of course! I guess Rösti can be compared to a hashbrown or
Latkae but it is actually a Swiss dish made of grated potatoes shaped into patties, either pan fried or baked. I could just copy and paste the whole wiki explanation but links are always good!

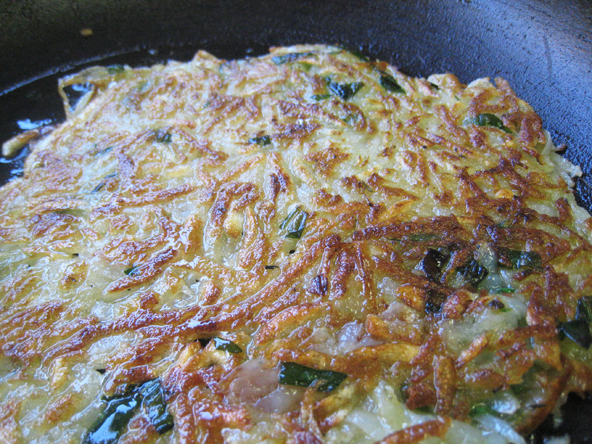
I broke open my Martha Stewart cook book and seeing as it was the easiest thing with ingredients I already had, I decided to give it a try. It was actually really really delicious, crisp and light and...potatoey if that's a word. The original recipe was to saute some wild mushrooms and put them on top but instead I just pan-fried some tilapia and steamed some vegetables to go with it. You can mix just about anything with it, I think next time I'll go for something cheesy.

Herbed Rösti
Modified from Martha Stewart's Cooking School


o 2 Large Russet Potatoes (Some recipes say to boil the potatoes 8-10 minutes prior to shredding but you can also use them raw as with this recipe.)
o 1/2 Small Leek, Julienned
o 1 Scallion, Chopped
o 1 Teaspoon Finely Chopped Thyme Leaves or Rosemary (I used dried Thyme, use and extra 1/2 tsp if you do)
o1 Teaspoon Fresh or Dried Parsley
o Coarse Salt and Freshly Ground Black Pepper
o 2 Tablespoons Unsalted Butter
o 2 Tablespoons Olive Oil

1. If baking instead of frying, go ahead and preheat over to 400 degree F.

2. Peel and grate both potatoes with a box grater. Soak shredded potatoes in a large bowl of cold water for around five minutes or so to get rid of starch or your Rösti will be very chewy. The potatoes may turn a rusty sort of color but that's alright, I spazzed and retched for about three seconds before I realized it goes away after a rinse.

3. While the potatoes are soaking, you can take this time to ready your vegetables/herbs and set them aside.

4. Lift shredded potatoes out with your hands and squeeze out liquid. Squeeze excess liquid into paper towels or clean kitchen towel. Here you can transfer it to another bowl, cover with plastic wrap and put in the refrigerator for half an hour or so. I wasn't being patient so I skipped that step. The Rösti ended up coming out a little softer than I would have liked so next time I think I'll just take the time to do that.

5. Toss all vegetables/herbs together in bowl.

6. If frying: Melt unsalted butter and/or oil in pan. Drop enough of the potato mixture into the pan to thinly layer the entire bottom where you cannot see any of the pan peeking through. Let the Rösti cook on one side until the edges turn a deep brown, then flip to cook other side. If you're not using a stainless steel pan with nicely sloped sides, I suggest making your Rösti into smaller patties so they can be flipped with a spatula.

If Baking: Melt butter into oven-safe pan, layer potatoes, then place in preheated over for 5-10 minutes.

7. After Rösti is done cooking, place on a place and top with your choice of vegetables, meat, or fish then enjoy!


Pan-Fried Tilapia

2 Tilapia Fillets (can substitute cod or halibut)
1 Teaspoon Olive Oil
♥ Coarse Salt and Freshly Ground Black Pepper
♥ 1 Teaspoon Sesame Seeds

1. Rub one side of fish fillets with olive oil. Season with a few pinches of salt and pepper, then sprinkle with sesame seeds. Flip over and do the other side.

2. Place tilapia in hot, oiled pan and cook until golden brown. Flip over with a spatula and fry the other side. When cooked scoop from pan and place on top of Rösti.

Wednesday, April 7, 2010

First Post and a Classic

I'm not usually the type of person who blogs, not much of a sharer and all, but I wanted to try something new so here it goes! I don't have much to talk about these days so a food blog seemed like the best idea, plus my mom has been telling me I should do one for awhile now. Hopefully I'll manage to keep someone interested.

Anywho! I figured that since this is my very first post, I should start with a classic. Probably the most well known cookie ever,
Chocolate Chip! Well, Black & White Chocolate Chip. I've been trying to cut down on my sugar intake (I know, criminal right?) but these are way too delicious. Thick and chewy and so gooey when warm. They didn't stick around very long.

Black & White Chocolate Chip Cookies
Modified from - Lovin' From the Oven (Because she's awesome and I stalk her blog like whoa)


2 cups all-purpose flour
1/2 teaspoon baking soda
1/2 teaspoon salt
3/4 cup unsalted butter, melted
1 cup packed dark brown sugar
1/2 cup white sugar
1 tablespoon vanilla extract
1/8 teaspoon almond extract (optional)
1 egg
1 egg yolk
1 cup semisweet chocolate chips (I used 70% Cocoa but that's not advised if you're not a dark chocolate lover)
1 cup white chocolate chips

1. Preheat your oven to 325 degrees F (165 degrees C). Grease cookie sheet or line with parchment paper.

2. Sift together the flour, baking soda and salt; set aside.

3. In a medium bowl, cream together the melted butter, brown sugar and white sugar until well blended. Beat in the extracts, whole egg, and then the egg yolk until creamy. Mix in the dry ingredients until just blended. Stir in your chocolate with a spatula or wooden spoon, feel free to add in extra chocolate because I sure did. Cookies can be dropped immediately onto cookies sheets a heaping spoonful at a time or the dough can be chilled for a half hour or more for a chewier cookie. Cookies should be about 3 inches apart.

4. Bake for 15 to 17 minutes in the preheated oven, or until the edges are lightly toasted. Cool on baking sheets for a few minutes before transferring to wire racks to cool completely.